Balance
What you need
You'll want to wear shorts, t-shirt and walking shoes (you'll also do barefoot). Please tie hair back if it touches your shoulders.
This is what you'll need for this check-in
- A well lit open area where 8-10 steps can be taken
- A tripod that can be tall enough to film your whole body, If you did not qualify as one of the first 100 participants with the proper iPhone (2+ lens), you can still participate, please order these additional supplies. See details below
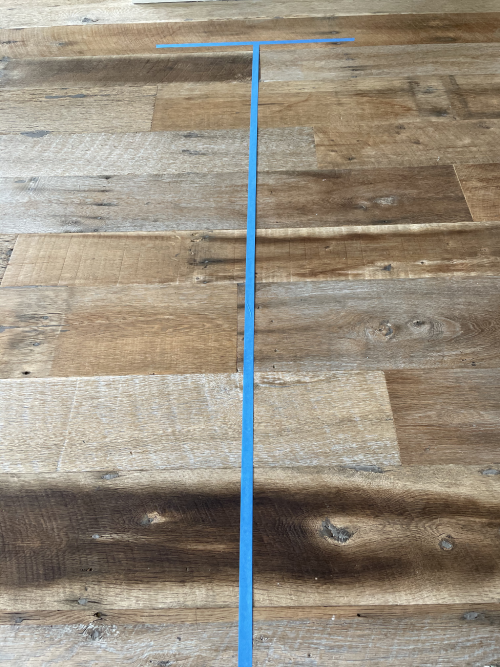
- Masking or painters tape for the floor (mark out a T shape with the tape on the floor - the top of the T will be one, 3’ piece of tape parallel to the wall and then one long strip extending from the wall about 6-8’ to make the long tail of the T)
- A hair tie (if appropriate)
- A helper willing to take photos and videos of you and is able to get up and down from the floor
Long tailed T
Set up the Line for the Balance and Walking Portion. We will be using the wall. So near a clear wall is the best.
You will be making a very "long tailed" T
- Starting with the top of the T, you will put 2 feet of tape on the ground about a foot from the wall, parallel to the wall.
- Then you will put about 8 feet of tape out from the center of the first line.

Camera Handling
Use a tripod. We will try to get some information out of these videos. It is important to hold the camera as still as possible. If you do not have a tripod, this is done by holding the camera with both hands, elbows tight on body and feet very stable. For standing photos the camera is to rest its side on the floor. This requires a flat floor, no carpet.
Line Stand Eyes Open
CAMERA VIEW
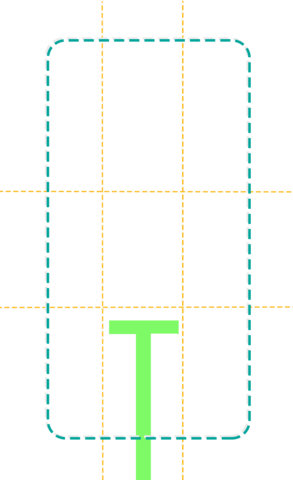
CAMERA - SET UP:
Portrait/tall camera in tripod at about shoulder level - directly in front of Participant with Participant's entire body in the frame. Record for 10 seconds If the Participant falls out of pose please ask them try one more time.
Participant:
Please stand with feet together, dominant foot lengthwise on the line.
Place hands on hips.
Take one natural step forward with non-dominant foot, place non-dominant foot lengthwise on the line.
Look at the camera and hold for 10 seconds. I will tell you when to stop.
One Leg Stand Eyes Open
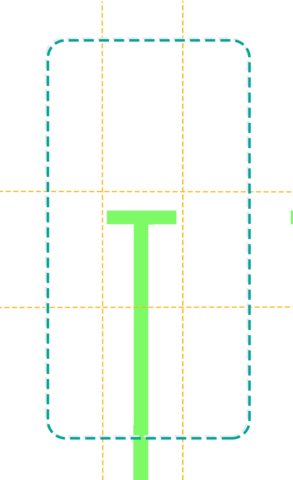
CAMERA VIEW
CAMERA - SET UP:
Portrait/tall camera in tripod at about shoulder level - directly in front of participant with participant's entire body in the frame. Record for 10 seconds If the Participant falls out of pose please ask them try one more time.
Participant:
Please stands with feet together, dominant foot on and parallel to the line.
Place hands on hips.
Raise foot of non-dominant leg, with knee bent 90º and shin parallel to floor.
Look at the camera and hold until I tell you to stop.
Line Stand Eyes Closed
CAMERA VIEW
CAMERA - SET UP:
Portrait/tall camera in tripod at about shoulder level - directly in front of Participant with Participant's entire body in the frame. Record for 10 seconds If the Participant falls out of pose please ask them try one more time.
Participant:
Please stand with feet together, dominant foot lengthwise on the line.
Place hands on hips.
Take one natural step forward with non-dominant foot, place non-dominant foot lengthwise on the line.
Close eyes and hold until I tell you to stop.
One Leg Stand Eyes Closed
CAMERA VIEW
CAMERA - SET UP:
Portrait/tall camera in tripod at about shoulder level - directly in front of Participant with Participant's entire body in the frame. Record for 10 seconds If the Participant falls out of pose please ask them try one more time.
Participant:
Please stands with feet together, dominant foot on and parallel to the line.
Place hands on hips.
Raise foot of non-dominant leg, with knee bent 90º and shin parallel to floor.
Close your eyes and hold until I tell you to stop.
Line Walk
CAMERA VIEW
CAMERA - SET UP:
Portrait/tall camera in tripod at about shoulder level - directly in front of participant with participant's entire body in the frame. Record for 6 steps. If the participant can not do 6 steps, please ask them try one more time.
Participant:
Please stand with feet together, dominant foot lengthwise on the line.
Place hands on hips.
Walk forward on the line in a natural walking stride, placing feet lengthwise on the line with each step.
Line Walk Heel to Toe
CAMERA VIEW
CAMERA - SET UP:
Portrait/tall camera in tripod at about shoulder level - directly in front of Participant with Participant's entire body in the frame. Record for 6 steps. If the Participant can not do 6 steps, please ask them try one more time.
Participant:
Please stand with feet together, dominant foot lengthwise on the line.
Place hands on hips.
Walk forward on the line, toe-to-heel, placing feet lengthwise on the line with each step as close to the foot on the line as possible.
Time Up and Go
CAMERA VIEW
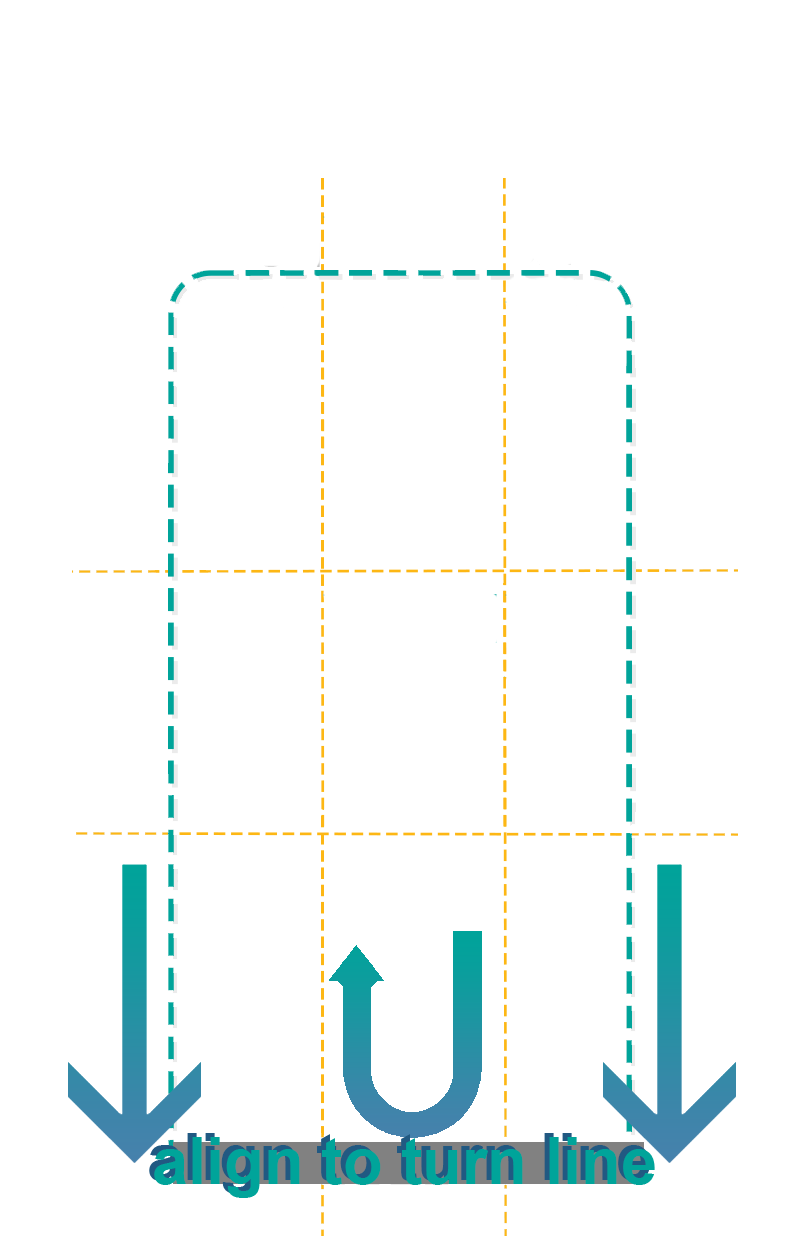
Safely mark 10 feet (3m) on the floor.
CAMERA OPERATOR INSTRUCTIONS:
The camera is set up in the cart, perpendicular to the ground and align the line with the turn line. You will need to lower the cart significantly. The goal is to see the participant feet and shoulders at all times while recording.
The participant sits still in the armchair with his/her back against the chair back.
[PRESS RED BUTTON] participant sits still for 3 seconds and then you say Go.
Task is done.
Wait 3 seconds with the participant sitting still. [PRESS RED BUTTON]
PARTICIPANT INSTRUCTIONS (read exactly as written):
Please sit still in an armchair with your back against the chair.
When I say Go, I want you to:
Stand up from the chair.
Walk to the line on the floor as quickly and safely as possible.
Turn.
Walk back to the chair as quickly and safely as possible.
Sit down again and sit still for at least 3 seconds.
Heel walking
CAMERA VIEW
CAMERA - SET UP:
Portrait/tall camera in tripod at about shoulder level - directly in front of Participant with the participant's entire body in the frame. Record for 6 steps. If the participant can not do 6 steps, please ask them try their best using any aids they would normally use. If the participant can’t take any steps, please snap a picture of the floor and move to the next item. Tap the arrow to close the words. Tap the screen to set focus.
Participant:
Walk on the backs of your heels with your feet up. Do the best that you can and use any aids you would typically use.
Walking
CAMERA VIEW
CAMERA SET-UP:
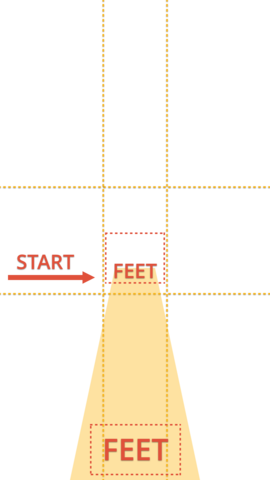
Portrait/tall camera in tripod at about shoulder level - directly in front of Participant with the participant's entire body in the frame. Make sure their feet are in the box at the start. Record for 6 steps or until their feet reach the box closest to you. If the participant can not do 6 steps, please ask them try their best using any aids they would normally use.
Participant:
Stand in the box START. Take 6 steps. Stop with both feet in the frame. (this stop is important. Please, re-do if feet went too far and are not seen at stop.)