Foot Calculator
- What you need
- Sticker Placement
- Camera Placement
- External Arch Left Standing
- Internal Arch Right Standing
- Internal Arch Left Standing
- External Arch Right Standing
- Heels / Ankles Standing
- Heels / Ankles Kneeling
- External Arch Left Seated
- Internal Arch Right Seated
- Internal Arch Left Seated
- External Arch Right Seated
- Ankle Left Range of Motion
- Ankle Right Range of Motion
- Pin Prick
- Lunge Left
- Lunge Right
- Walking
- Heel walking
- Time Up and Go
What you need
This is what you need:
- A well lit open area with hardwood/tile floors
- 6 circle stickers (link to order)
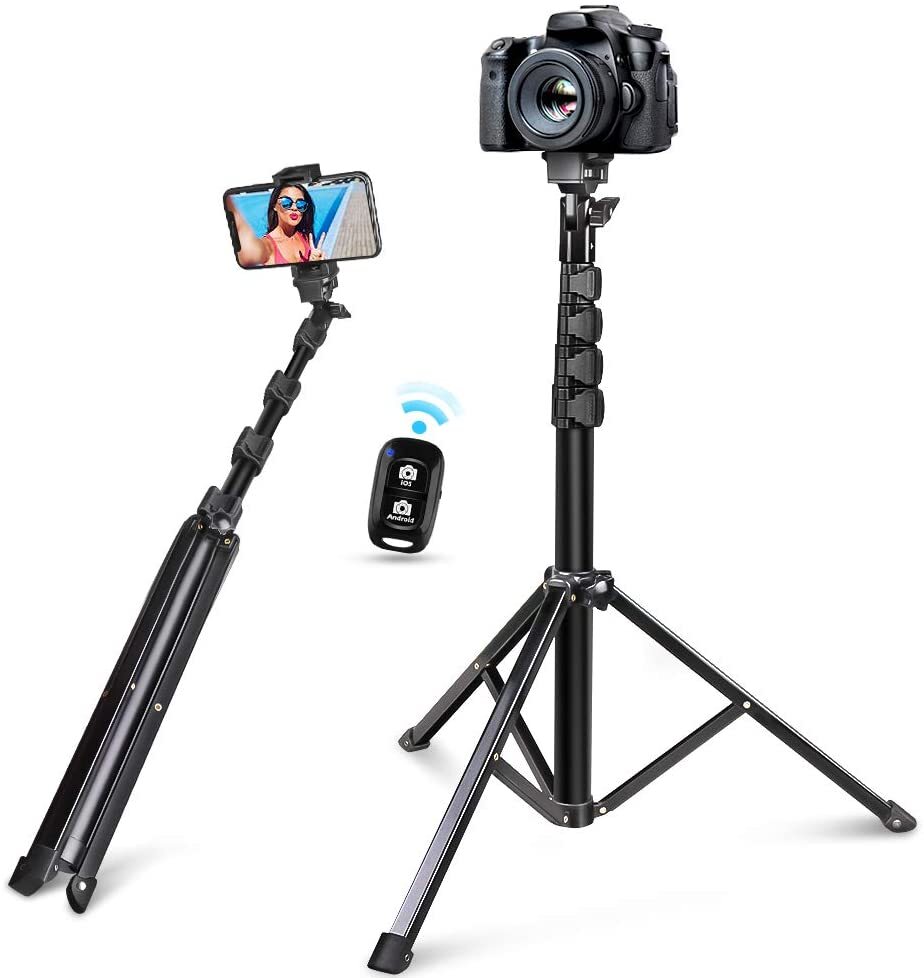
- A tripod (link to order)
- Safety pin or paper clip
- An arm chair
- A tape measure
- Tape or another safe way to mark a distance to walk
- A helper willing to take photos and videos of you and is able to get up and down from the floor
You will do this a practice run now. Maybe you don't have all the supplies, that is totally fine. You can always have a second, third, forth run through. Just email the HNF coordinator at registrycoordinator@hnf-cure.org and ask to have the Foot Calculator assigned again. (please allow 24 hours for response).
You will complete a set of photo captures. Feet without socks or pants covering your skin. We are trying to see your arch so please be sure to stand on a hard floor, no carpeting. Please make sure the background is not busy or the same color as your feet.
You'll want to wear shorts, t-shirt and walking shoes (you'll also do barefoot). Please tie hair back if it touches your shoulders.
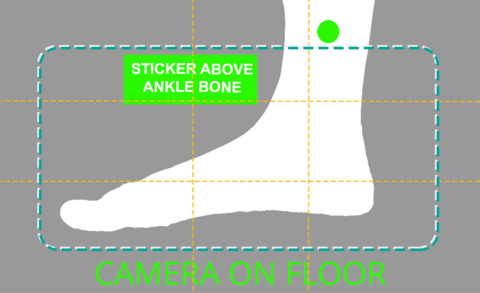
You will need 6 green stickers. One on either side above the ankle bone and one on the back of your calf a little higher than the side stickers. You will stand like a flamingo - with each foot to be photographed, showing the internal and external arches each alone. Then you will stand with your feet straight ahead and slightly apart for a photo of your heels.

Sticker Placement
You will use stickers to attain automatic measurements. It is important that you put these on properly.
SMALL ROUND STICKERS
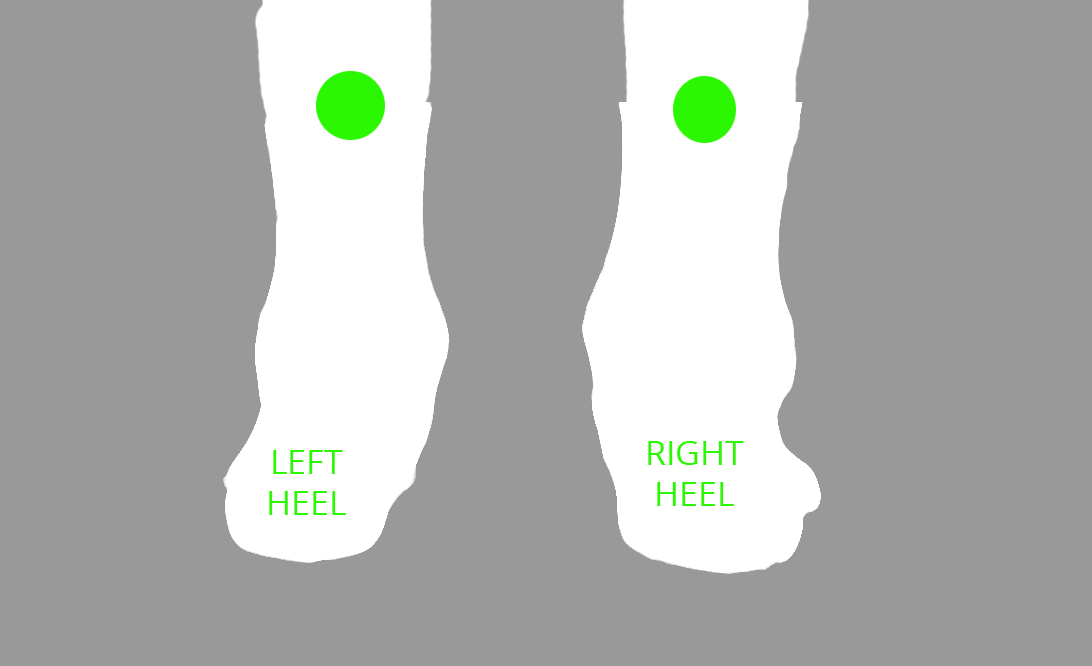
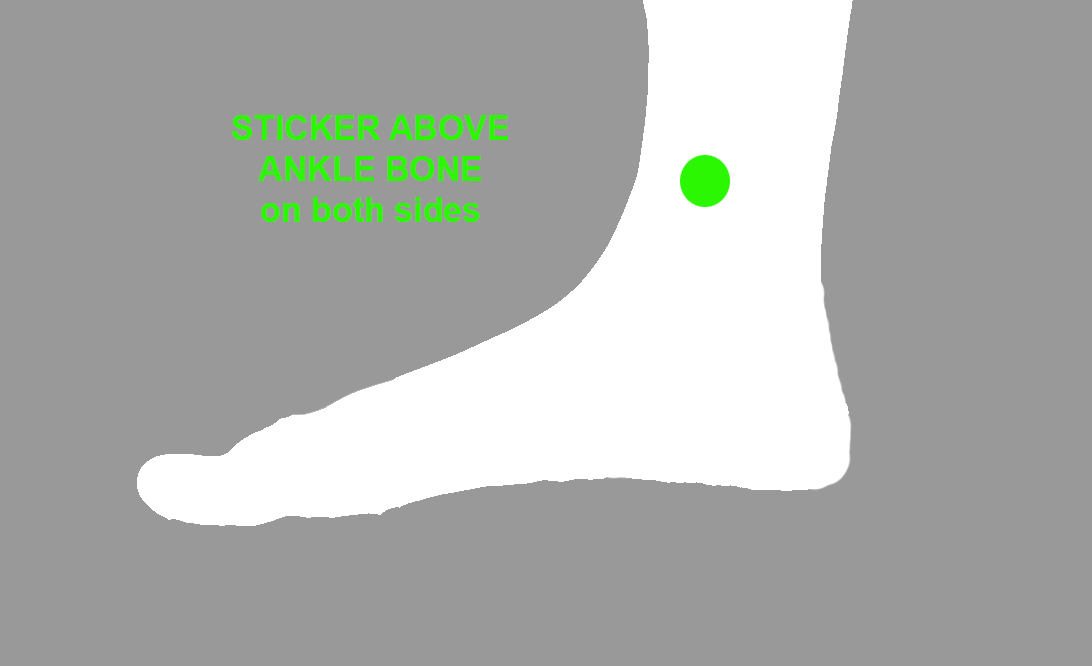
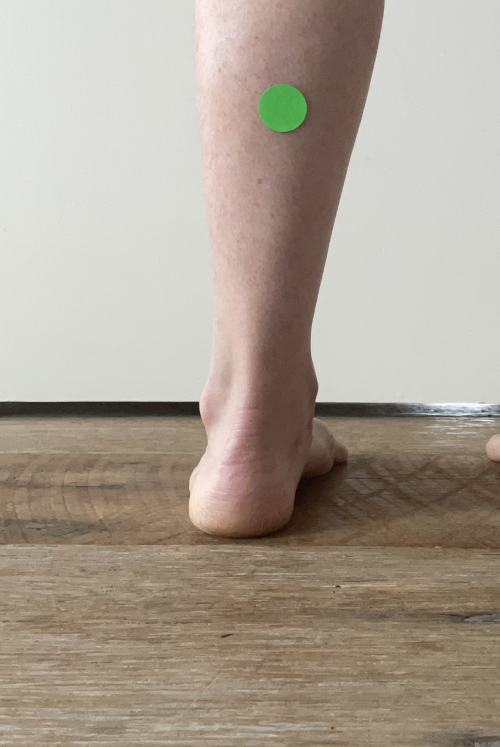
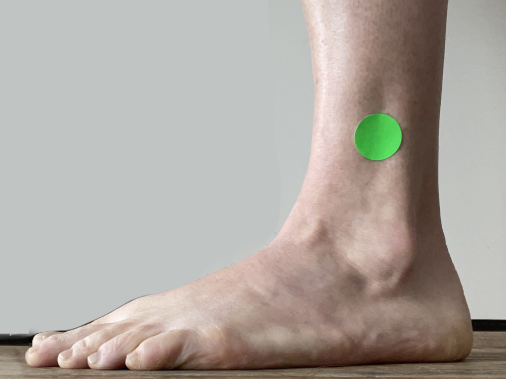
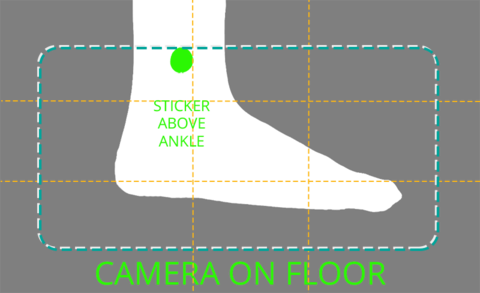
The small green stickers are for the foot calculator photos. You will put 6 stickers on total, 3 on each leg. One on either side of the leg and one on the back of the leg. Be sure to have all the stickers above the ankle.
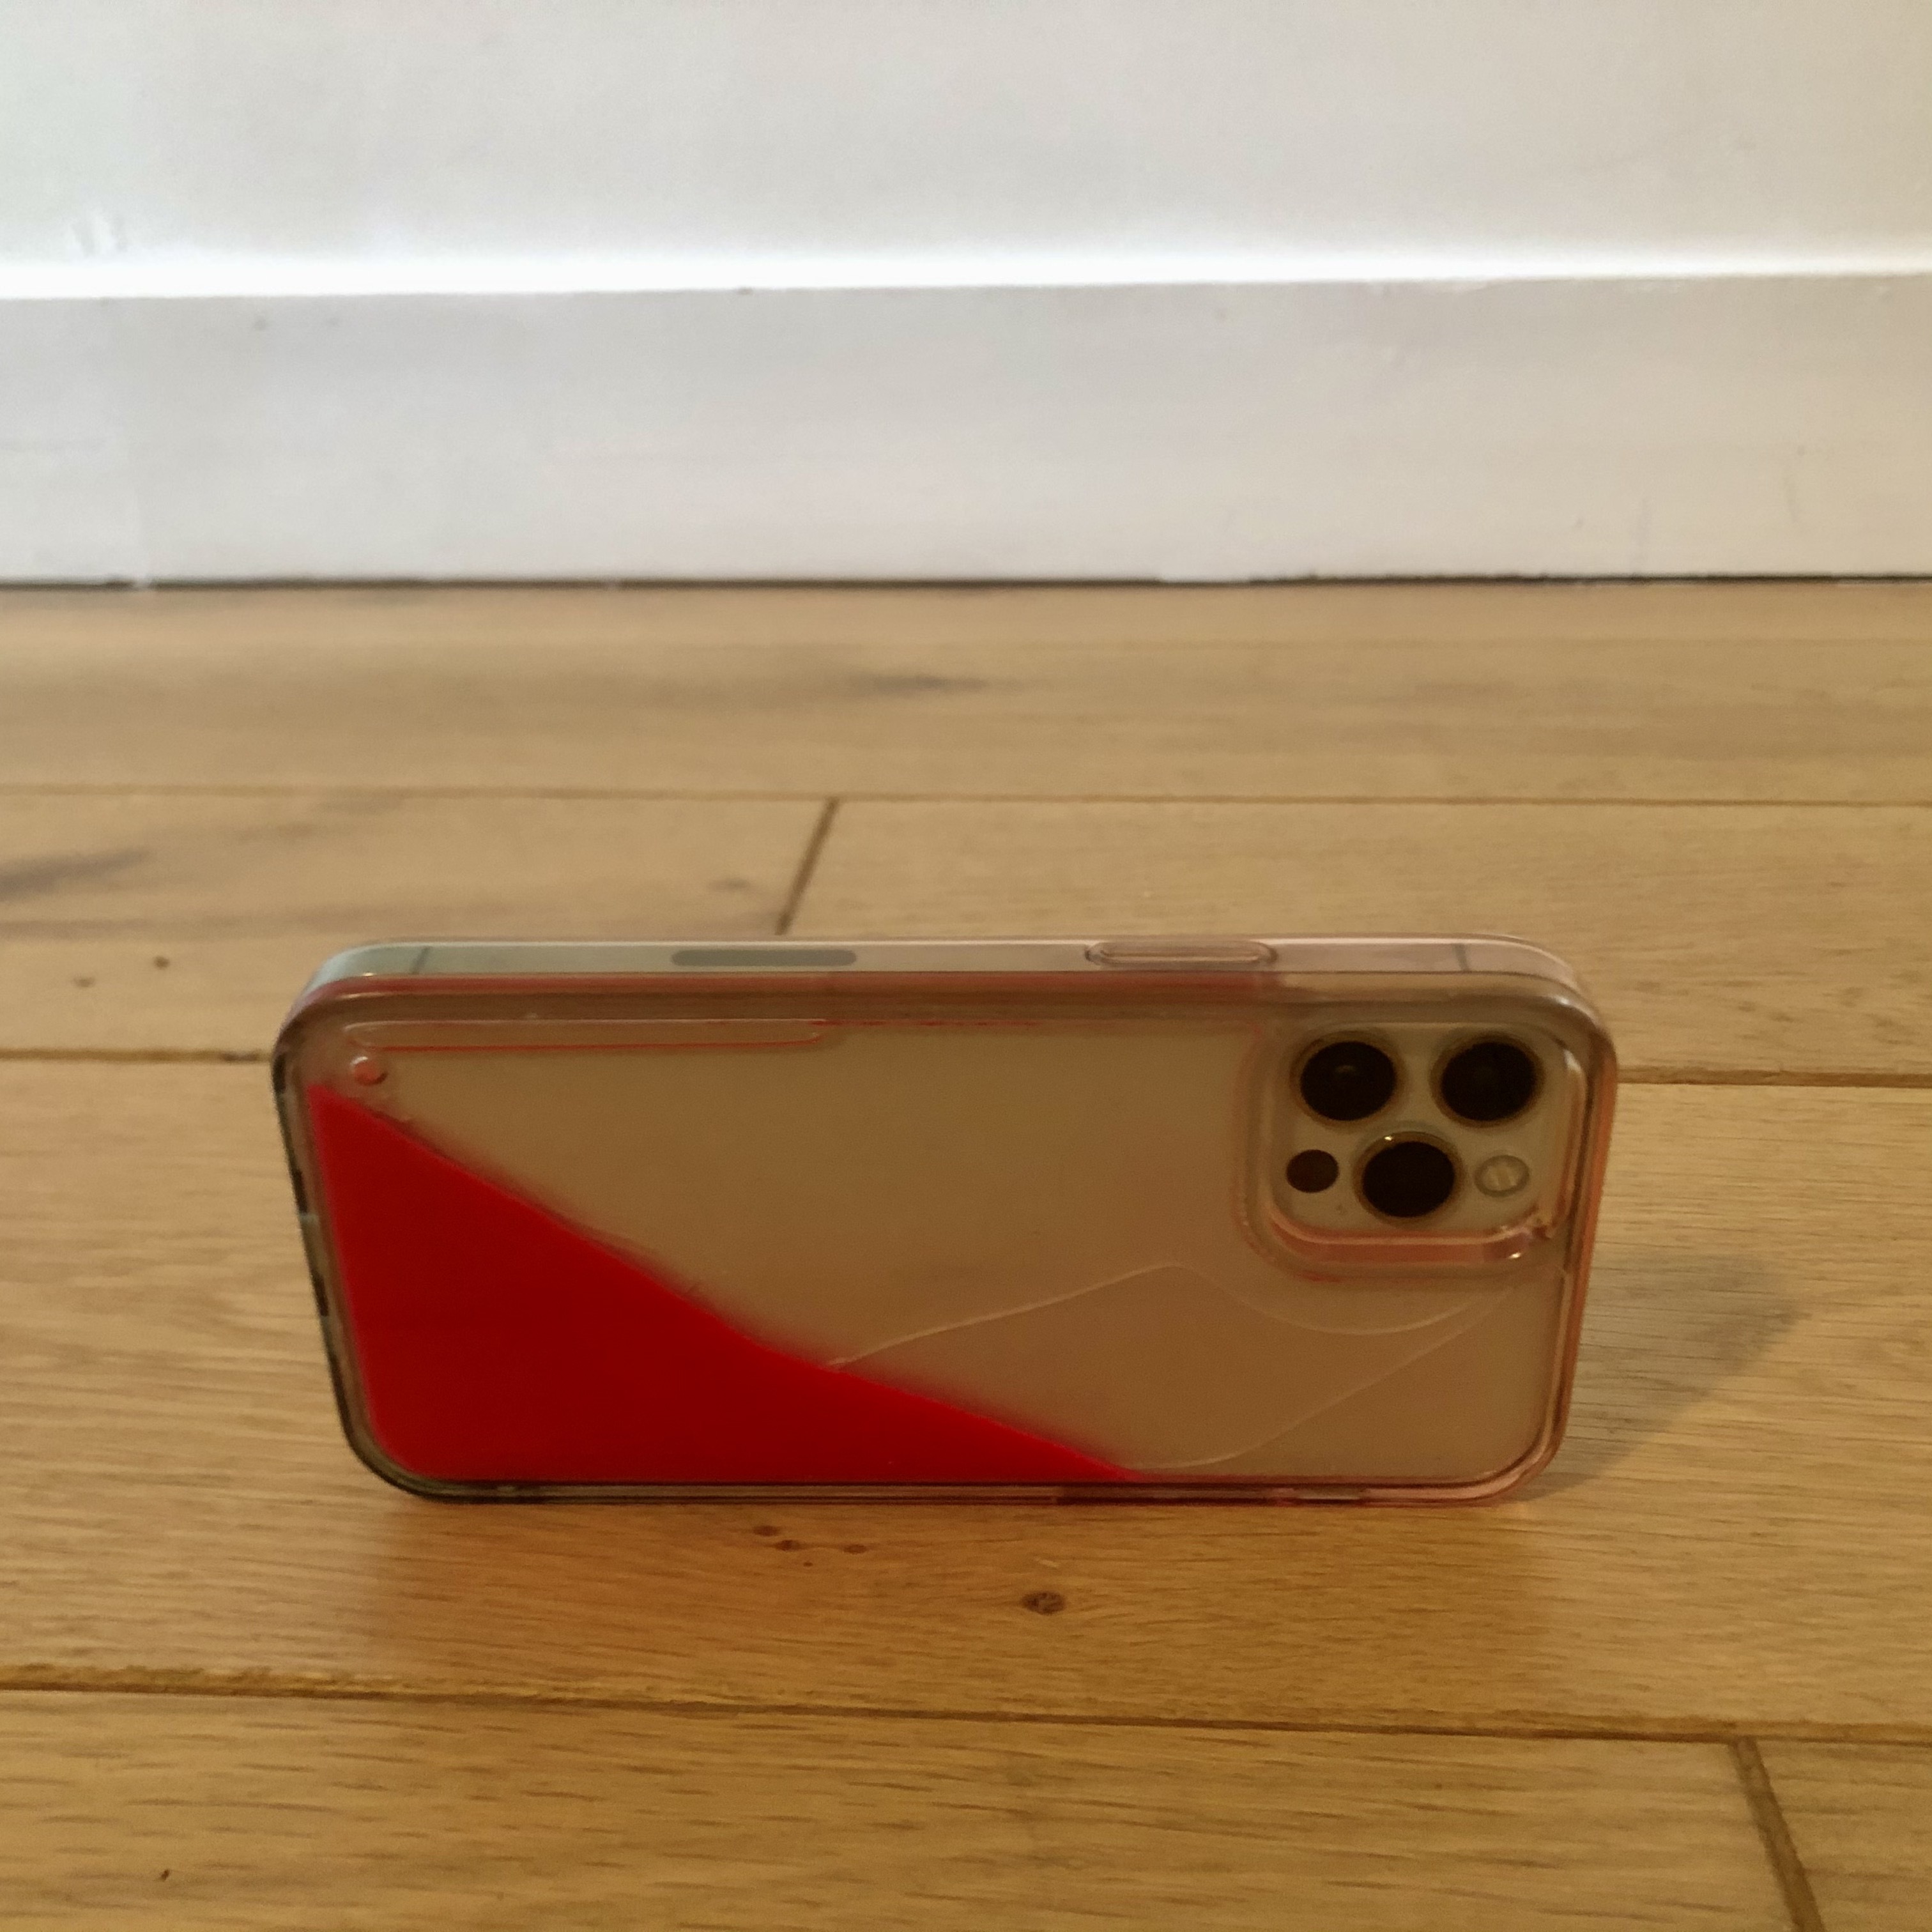
Camera Placement
For the foot photos please have the camera sitting horizontally (WIDE) on a clean hard floor (no carpeting) with the lenses at the top. Please see the images below on how to position the camera on the floor.
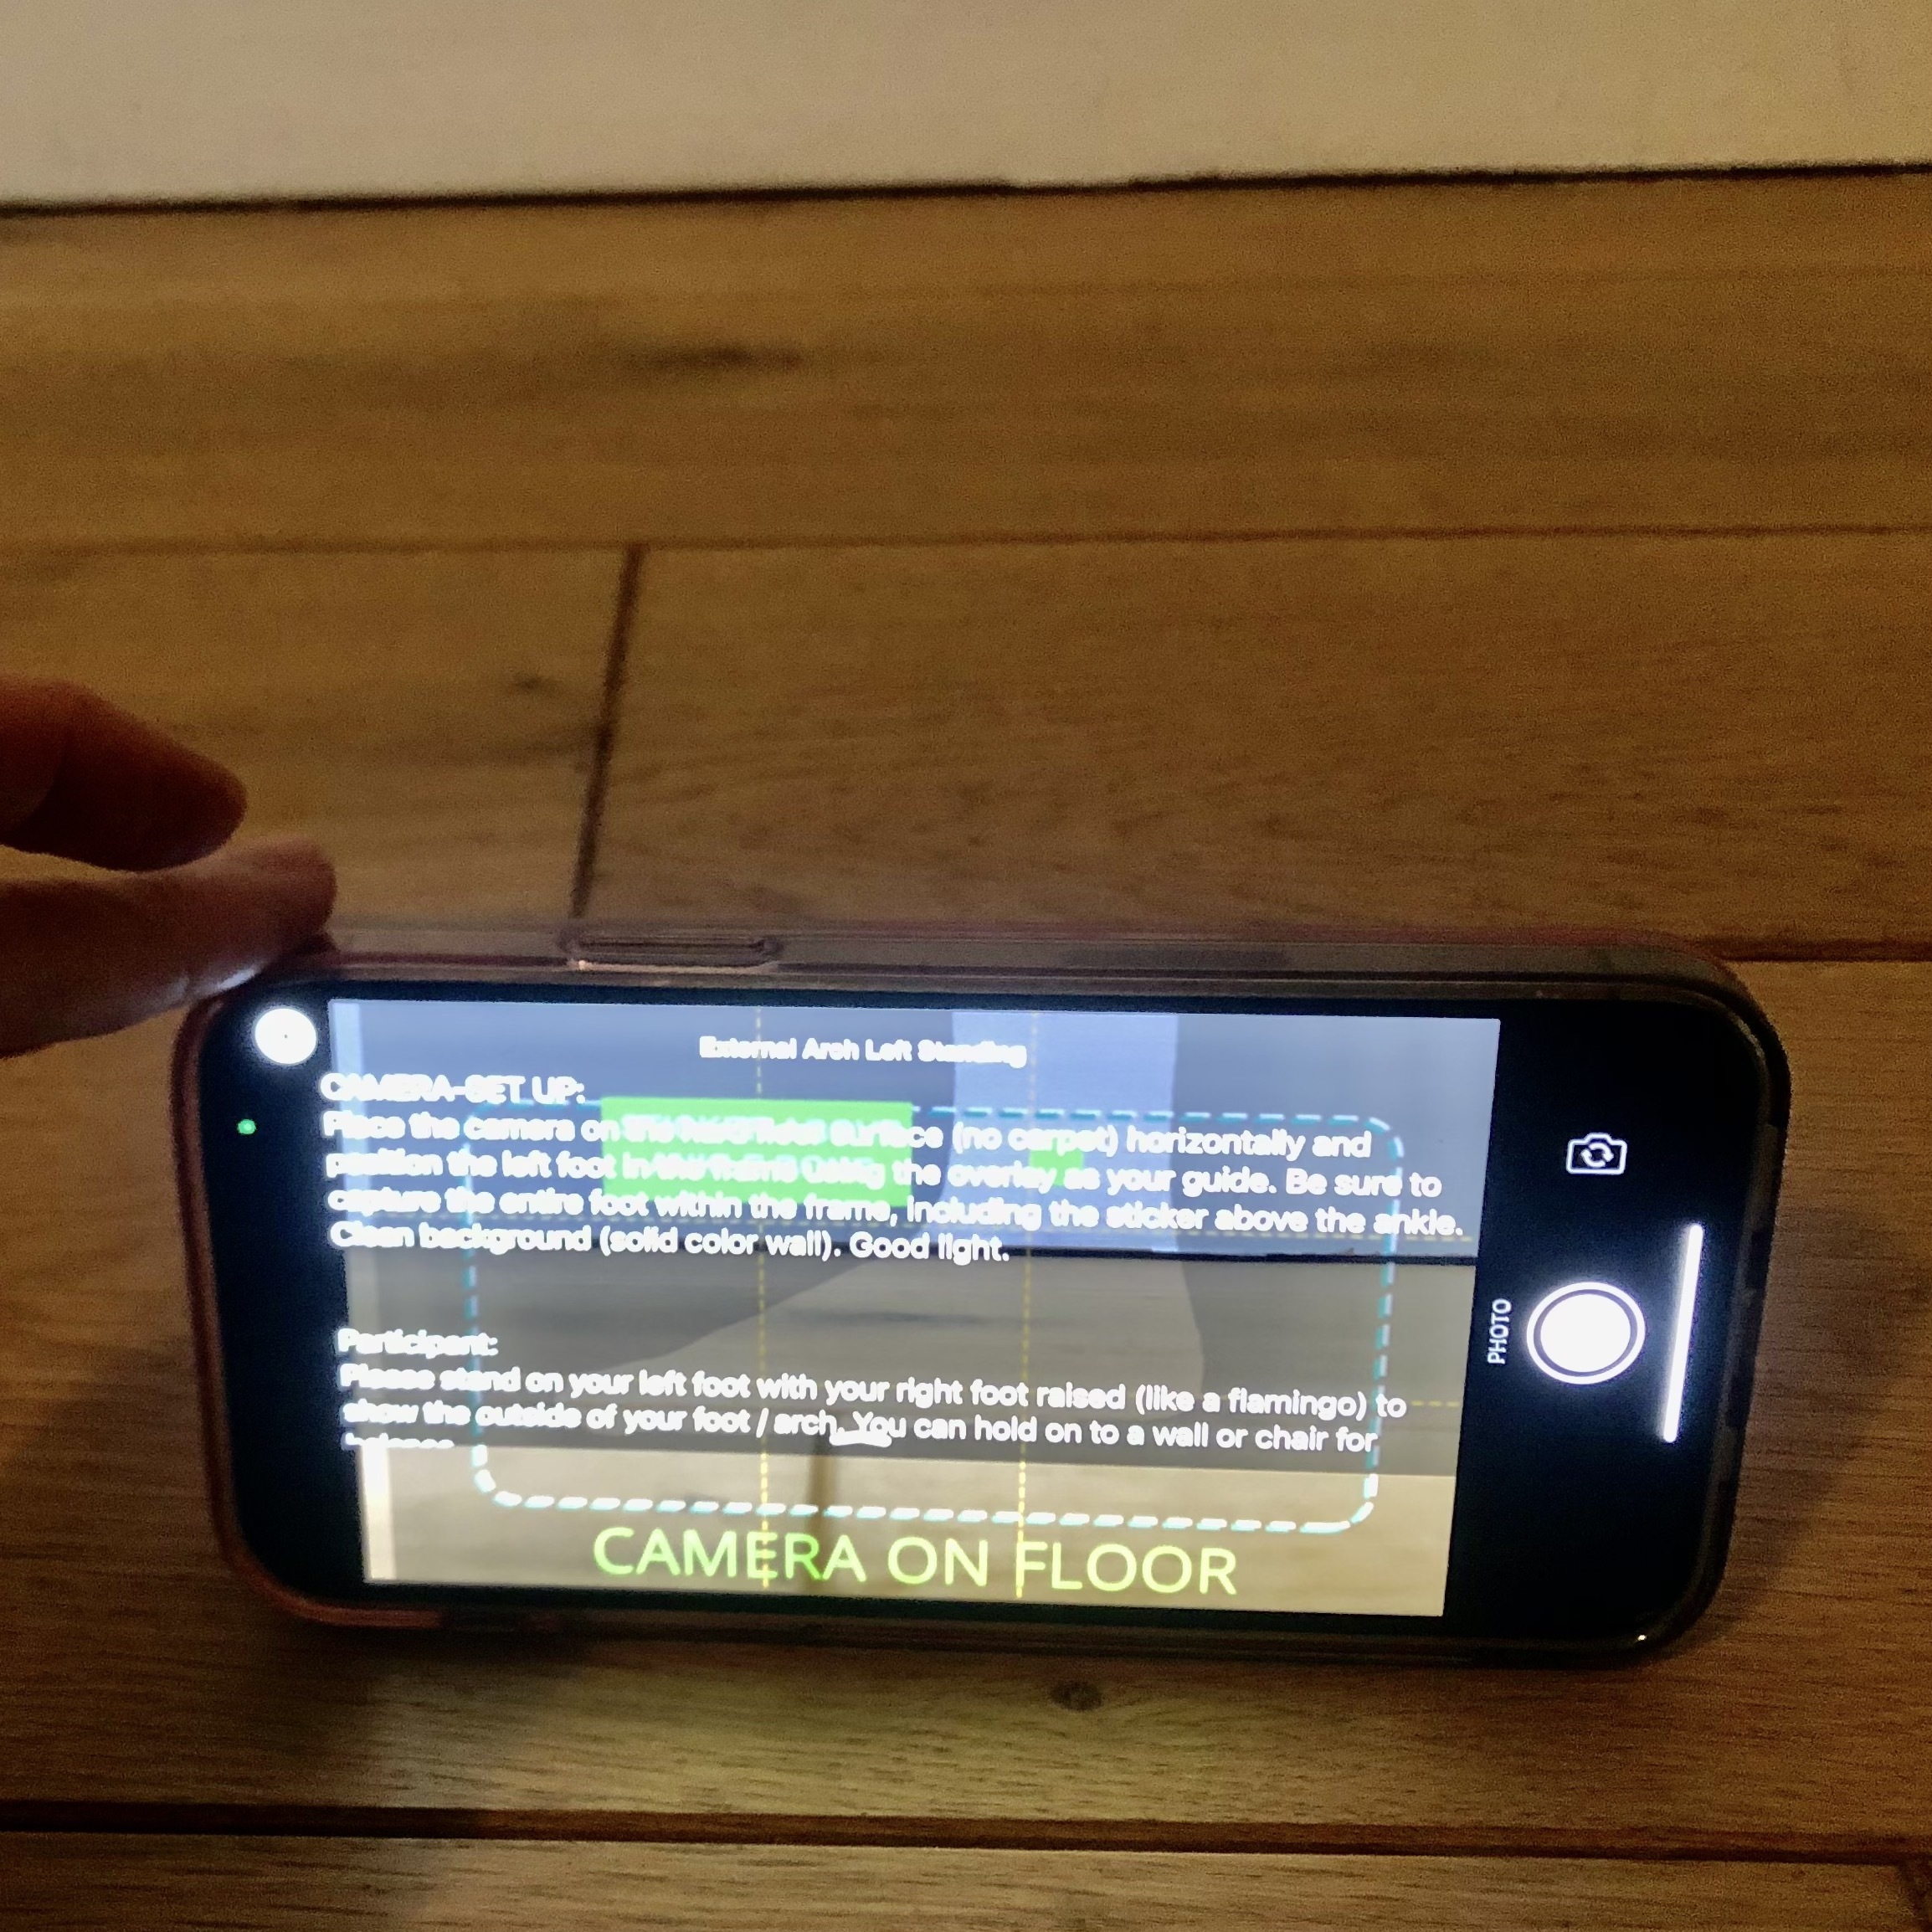
For the other photos either have the camera in the tripod or hold steady in your two hands, as directed on the camera screen.
External Arch Left Standing
CAMERA VIEW
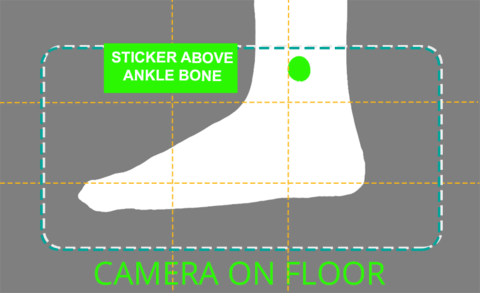
CAMERA - SET UP:
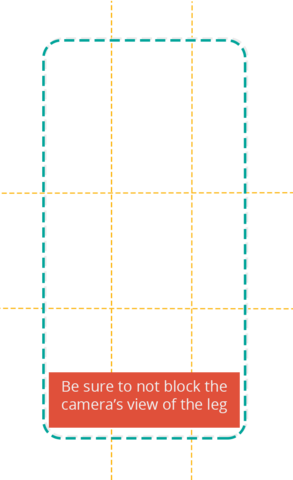
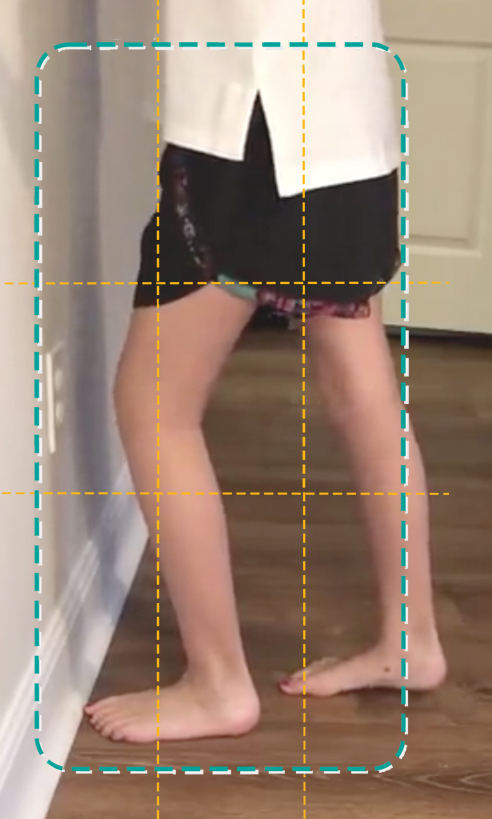
Place the camera on the hard floor surface (no carpet) wide with the camera lenses at the top about 12 inches from the leg. Position the left foot in the frame using the overlay as your guide. Be sure to capture the entire foot within the frame, including the sticker above the ankle bone. Clean background (solid color wall). Good light.
Participant:
Please stand on your left foot with your right foot raised (like a flamingo) to show the outside of your foot / arch. You can hold on to a wall or chair for balance.
Internal Arch Right Standing
CAMERA VIEW
CAMERA SET-UP:
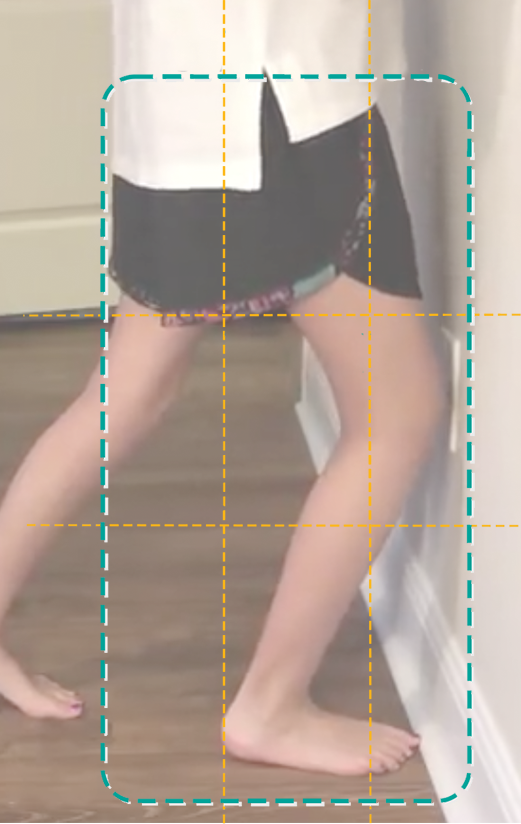
Place the camera on the hard floor surface (no carpet) wide with the camera lenses at the top about 12 inches from the leg. Position the right foot in the frame using the overlay as your guide. Be sure to capture the entire foot within the frame, including the sticker above the ankle bone. Clean background (solid color wall). Good light.
Participant:
Please stand on your right foot with your left foot raised (like a flamingo) to show the inside of your foot / arch. You can hold on to a wall or chair for balance.
Internal Arch Left Standing
CAMERA VIEW

CAMERA SET-UP:
Place the camera on the hard floor surface (no carpet) wide with the camera lenses at the top about 12 inches from the leg. Position the left foot in the frame using the overlay as your guide. Be sure to capture the entire foot within the frame, including the sticker above the ankle bone. Clean background (solid color wall). Good light.
Participant:
Please stand on your left foot with your right foot raised (like a flamingo) to show the inside of your foot / arch. You can hold on to a wall or chair for balance.
External Arch Right Standing
CAMERA VIEW
CAMERA SET-UP:
Place the camera on the hard floor surface (no carpet) wide with the camera lenses at the top about 12 inches from the leg. Position the right foot in the frame using the overlay as your guide. Be sure to capture the entire foot within the frame, including the sticker above the ankle bone. Clean background (solid color wall). Good light.
Participant:
Please stand on your right foot with your left foot raised (like a flamingo) to show the outside of your foot / arch. You can hold on to a wall or chair for balance.
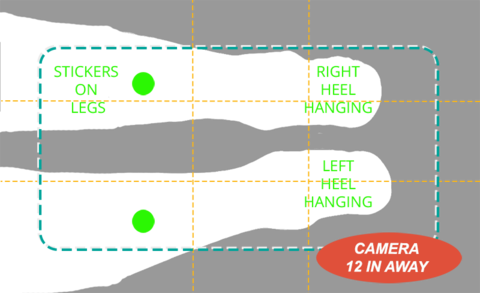
Heels / Ankles Standing
CAMERA VIEW

CAMERA SET-UP:
Place the camera on the hard floor surface wide with the camera lenses at the top (no carpet). Position both feet and ankles in the frame using the overlay as your guide. Be sure to capture both feet and ankles within the frame, including the sticker. Clean background (solid color wall). Good light.
Participant:
Please stand with your back to the camera, facing a clean wall and position your heels and feet according to your photographer's (helper's) instructions. You can put your hands on the wall for balance.
Heels / Ankles Kneeling
CAMERA VIEW
CAMERA-SET UP:
Manually hold the camera and position the heels and ankles, including the stickers, in the frame of the overlay to take the picture. Clean background (solid color/textured floor). Good light.
Participant:
Please kneel on a chair so that the legs and heels can be photographed.
External Arch Left Seated
CAMERA VIEW
CAMERA - SET UP:
Place the camera on the hard floor surface (no carpet) wide with the camera lenses at the top about 12 inches from the leg. Position the left foot in the frame using the overlay as your guide. Be sure to capture only the entire left foot within the frame, including the sticker above the ankle bone. Clean background (solid color wall). Good light.
Participant:
Please sit and hold your left foot up so that is not touching the ground at all to show the outside of your foot / arch.
Internal Arch Right Seated
CAMERA VIEW
CAMERA - SET UP:
Place the camera on the hard floor surface (no carpet) wide with the camera lenses at the top about 12 inches from the leg. Position the right foot in the frame using the overlay as your guide. Be sure to capture only the entire right foot within the frame, including the sticker above the ankle bone. Clean background (solid color wall). Good light.
Participant:
Please sit and hold your right foot up so that is not touching the ground at all to show the inside of your foot / arch.
Internal Arch Left Seated
CAMERA VIEW
CAMERA - SET UP:
Place the camera on the hard floor surface (no carpet) wide with the camera lenses at the top about 12 inches from the leg. Position the left foot in the frame using the overlay as your guide. Be sure to capture only the entire left foot within the frame, including the sticker above the ankle bone. Clean background (solid color wall). Good light.
Participant:
Please sit and hold your left foot up so that is not touching the ground at all to show the inside of your foot / arch.
External Arch Right Seated
CAMERA VIEW
CAMERA - SET UP:
Place the camera on the hard floor surface (no carpet) wide with the camera lenses at the top about 12 inches from the leg. Position the right foot in the frame using the overlay as your guide. Be sure to capture only the entire right foot within the frame, including the sticker above the ankle bone. Clean background (solid color wall). Good light.
Participant:
Please sit and hold your right foot up so that is not touching the ground at all to show the outside of your foot / arch.
Ankle Left Range of Motion
CAMERA VIEW
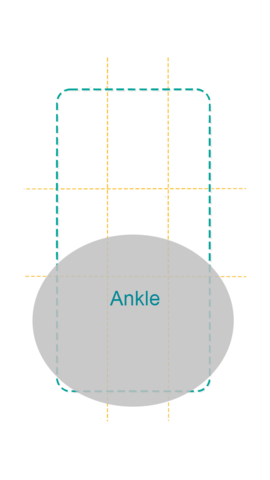
CAMERA - SET UP:
Place the camera in the tripod vertically and position the foot in the frame using the overlay as your guide. Be sure to capture the entire foot within the frame. This will be a video. Clean background (solid color wall). Good light.
Participant:
Please sit and hold your left foot up so that is not touching the ground at all to show how much you can rotate your ankle. Three times slowly clockwise. Three times slowly counter-clockwise. Do your best.
Ankle Right Range of Motion
CAMERA VIEW
CAMERA - SET UP:
Place the camera in the tripod vertically and position the foot in the frame using the overlay as your guide. Be sure to capture the entire foot within the frame. This will be a video. Clean background (solid color wall). Good light.
Participant:
Please sit and hold your right foot out as instructed by your photographer to show how much you can rotate your ankle. Three times slowly clockwise. Three times slowly counter-clockwise.
Pin Prick
CAMERA VIEW
CAMERA - SET UP:
Place the phone in the tripod vertically with the participant's legs in the frame of the overlay. Be sure not to stand blocking the activity. This exam is to determine if the participant is able to discriminate between the dull and sharp sides of a safety pin or paper clip. Clean background (solid color wall). Good light. Start the video. Photographer (helper) will randomly use sharp or dull end of the safety pin or paper clip. Starting at the mid-thigh of dominant leg, tap the sharp or round end 3-5 times and ask, "dull or sharp?". Acknowledge "yes" or "no" for the camera. Continue this at each spot: below the knee cap, mid-shin, either side of ankle bone, and inch down the foot to the big toe - acknowledging "yes" or "no" for the camera each time.
Participant:
Please have your eyes closed during the test, in order to keep focus throughout the exam. Show the bare skin of your dominant leg (the leg you would use to kick a ball).
Lunge Left
CAMERA VIEW
CAMERA SET-UP:
Place the camera in the tripod vertically and position the foot and knee in the frame using the overlay as your guide. Be sure to capture the entire foot and knee within the frame. This will be a video. Clean background (solid color wall). Good light.
Participant:
Place your left foot in such a way that a imaginary line drawn through the heel and big toe are aligned on a tape measure on the floor. Lunge forward until your knee touches the wall. Your left heel is required to remain in contact with the floor at all times. Move your left foot away from the wall to the point where the left knee can only make slight contact with the wall, while the left heel remains in contact with the floor. Your other leg can rest on the the floor and you are allowed to hold onto the wall for support. Note the measurement where your big toe is resting for the video. Do your best.
Lunge Right
CAMERA VIEW
CAMERA SET-UP:
Place the camera in the tripod vertically and position the foot and knee in the frame using the overlay as your guide. Be sure to capture the entire foot within the frame. This will be a video. Clean background (Solid color wall). Good light.
Participant:
Place your right foot in such a way that a imaginary line drawn through the heel and big toe are aligned on a tape measure on the floor. Lunge forward until your right knee touches the wall. Your right heel is required to remain in contact with the floor at all times. Move your right foot away from the wall to the point where the right knee can only make slight contact with the wall, while the right heel remains in contact with the floor. Your other leg can rest on the the floor and you are allowed to hold onto the wall for support. Note the measurement where your big toe is resting for the video. Do your best.
Walking
CAMERA VIEW
CAMERA SET-UP:
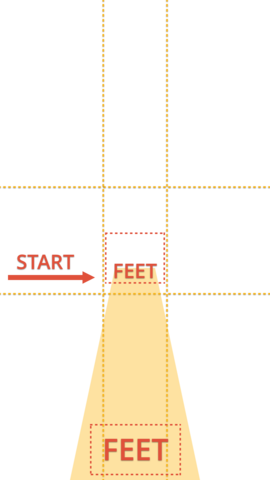
Place the camera in the tripod vertically and position the participant in the start box in the frame using the overlay as your guide. Be sure to capture the entire body within the frame. This will be a video. Clean background (solid color wall). Good light. Start the video. Ask the participant to walk 6 steps and they MUST stop in the box in the frame. Please re-do to ensure they start and stop in the boxes marked in the frame (less or more steps, as necessary).
Participant:
Please walk as you normally do and follow the instructions of your photographer (helper). Use any aids you would normally use.
Heel walking
CAMERA VIEW
CAMERA - SET UP:
Place the camera in the tripod vertically and position the participant in the start box in the frame using the overlay as your guide. Be sure to capture the entire body within the frame. This will be a video. Clean background (solid color wall). Good light. Start the video. Ask the participant to walk on their heels and stop in the box in the frame. Do your best.
Participant:
Follow the instructions of your photographer (helper). Use any aids you would normally use.
Time Up and Go
CAMERA VIEW
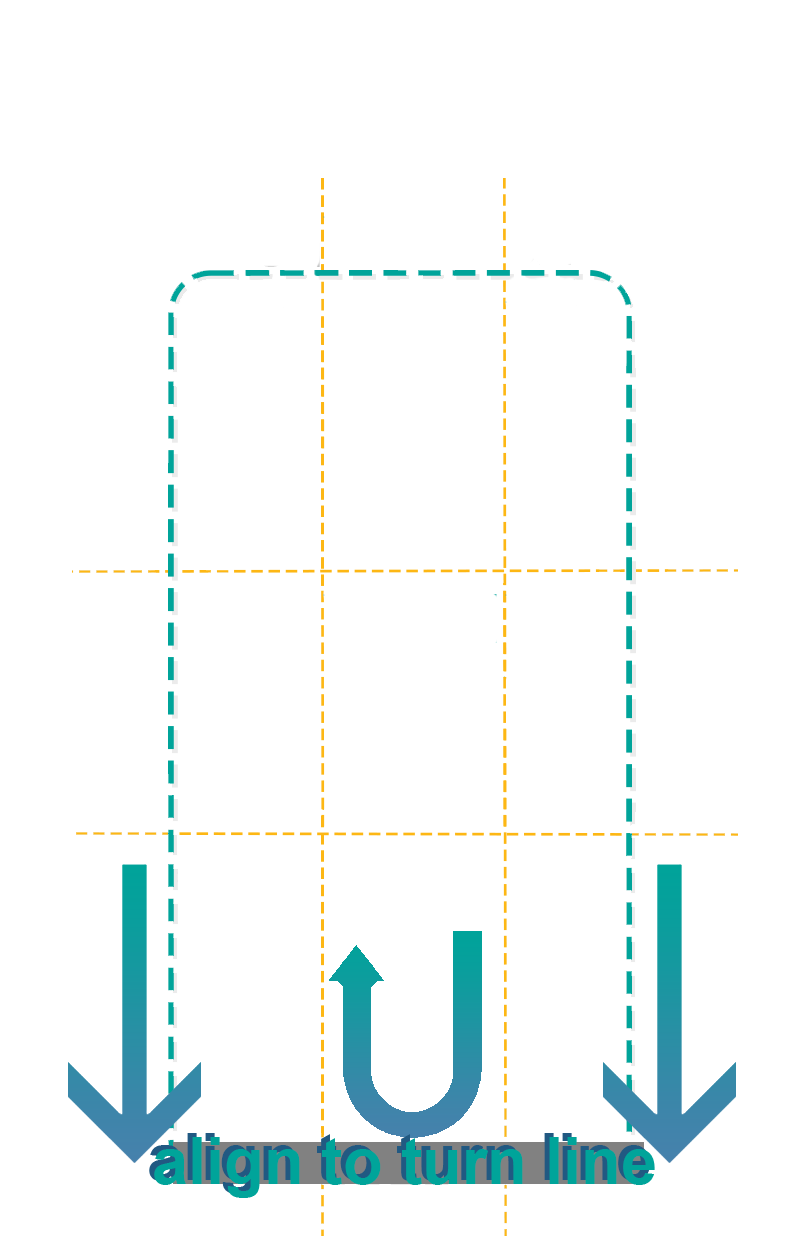
CAMERA - SET UP:
Please place a piece of tape marking 10 feet on a hard floor (no carpet) with an armchair at the far end. Place the camera in the tripod vertically to capture the participants shoulder and feet at all times while recording. Align the line on the floor with the turn line in the overlay. Ask the participant to sit still with their back against the back of the armchair. Read these instructions exactly as written: "When I say Go, I want you to:
Stand up from the chair. Walk to the line on the floor at your normal pace. Turn. Walk back to the chair at your normal pace. Sit down again and sit still for at least 3 seconds."
Start the video. After 3 seconds, say "Go". It is important that the patient is still in the video for 3 seconds before moving and 3 seconds after moving, this is how the camera registers the patient for the scan.
Participant:
Please walk as you normally do and follow the instructions of your photographer (helper). Use any aids you would normally use.